Currently the following Pattern-Sizes are supported:
The following Pattern-Sizes are supported:
4x16
4x32
4x64
8x8
8x16
8x32
8x64
9x9
10x10
11x11
12x12
16x8
24x8
32x4
32x8
32x16
40x8
48x8
56x8
64x6
64x8
96x4
96x8
98x6
128x4
128x8
The "Debug-Flag"
The Debug Flag has been constantly enhanced during development. Currently the following Options are supported:
1 - Switch Debug Console ON
2 - Use "Snap again" during Search. This will update the Snapshot using the Parameters from the last taken Snapshot.
4 - Use "X-Ray Search". This will start an enhanced search that is more color-independent and takes much longer time.
Especially together with Option "64 -Extended Search" it may find a lot more results.
Using this Option, the most upper Line and the most left Line are ignored.
Therefore this Option will reduce the effective Pattern-Size by -1 in X- and Y-Direction.
For example a Pattern that was size "8x8" will be a Pattern size "7x7", this is important when you specify needed "Pixelhits".
8 - If added, this will disable one Layer of "Fuzzy-Logic". This Flag will make the Search more sensitive to small color-differences
16 - If used, this Flag will internally invert the Images. Use it preferably with Option "4 - X-Ray Search".
32 - If used, this Flag will internally complement the Images. Use it preferably with Option "4 - X-Ray Search".
64 - "Extended Search". This search uses longer time, but returns more results. Use it preferably with Option "4 - X-Ray Search"
Using the Human-Eye Recorder and Pattern-Search Technology
Traditionally the SPR tries to find a Control or GUI-Element using the Windows- or Accessibilty-Properties.
There are cases where GUI-Forms (for Example if they are Proprietary, Java-based, or in unsupported Browsers)
can not be analyzed, and therefore could traditionally not easily be accessed.
For all cases where you can not find anything using the traditional Technologies, the SPR now supports the "Human Eye Technology".
It does not analyze any "Windows internal structures". It does not need any PlugIns.
It will simply do what you also do: It will "Look at the Screen".
When do we use it?
The first thing you should do is, find out if you can use conventional Technology.
For this, the Acc.-Inspector which is built into the SPR-Editor gives you all needed Information.
If it does not reflect the Text in the Form, you are going to analyze, then the way to go is to use the new HE-Technology.
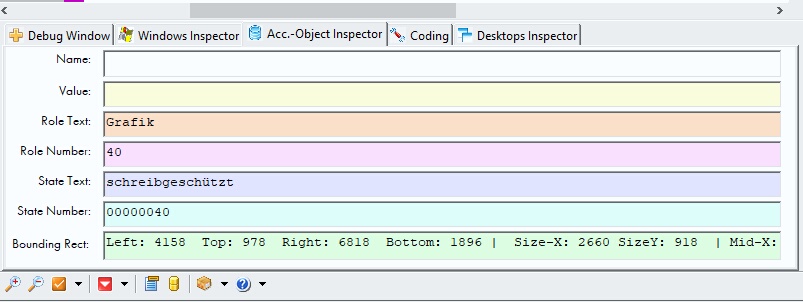
Using the Acc.-Inspoector you can easily find out if the conventional Acc.-Technology will work or not.
How does the HE-Technology work?
It will take Snapshot of the currently localized Window.
Then it will simply find a Pattern that you provide.
It will work very reliable also on different Computers as long as the Application Sizing (dpi) is the same as on the recorded Computer.
This is because the internal "Fuzzy Logic" will recognize Patterns that are different from the original Pattern to a large degree.
When will it NOT work?
If the target System is set to 120% and the recording was made with 100% the current implementation will NOT work.
The reason is very Simple, in such case the Patterns do not match.
1. Best set the Scaling of your Screen to 100%, otherwise the HE-Recorder may not record the proper places.
2. Under Windows 11 - generally - and under Windows 10 depending on what you are doing, the HE-Recorder NEEDS ADMIN_RIGHTS.
Otherwise you will see that only unicolored Boxes are recorded. This is a typical Sign that the HE-Recorder does not have sufficient Rights.

The whole Process is only a few steps.
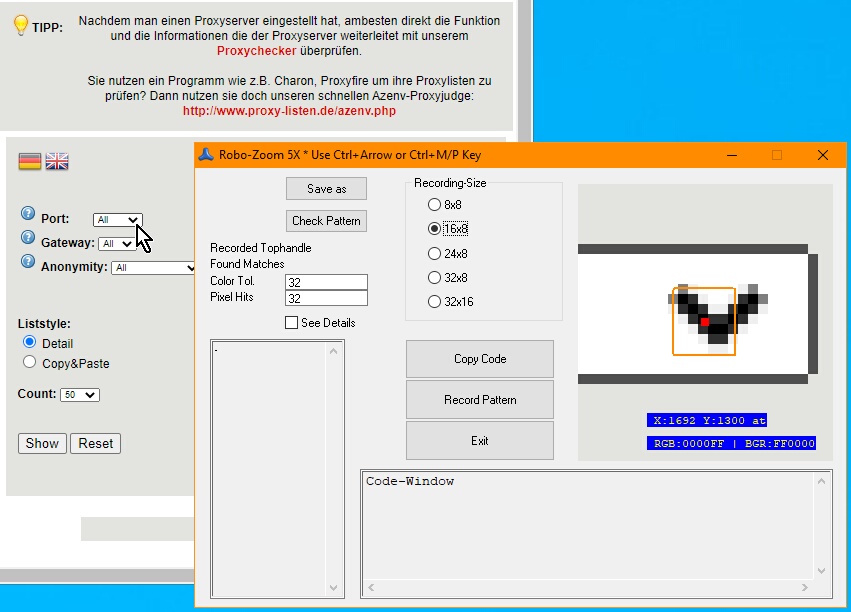
1. Start The HE-Recorder, choose a Patternsize, for Example 16x8
2. Click on "Record Pattern"
3. Move the Mouse to the Pattern. Try to have the Pattern touch the left upper Border
4. Click the Left Mousebutton to record the Target Pattern
5. Click on "Check Pattern". A new Window opens and you can verify if the Parameters are perfect.
6. Now you can change the Parameters for "Color-Tolerance" and "Pixel-Hits"
7. When you are done, click on "Save as" and Save your recorded Pattern directly into the Project Folder.
8. Click the "Copy Code" Button to get the Code into the Clipboard.
9. Paste the Code into sour Script.
This is the Form where we recorded a Buttonclick. This is the HE-Recorder how he looks with the Record.


This is the Result when we click on "Check Pattern". This is the Window that comes up when the "See Details" Button is checked.
What does "Check Pattern" do?
"Check Pattern" will show you, if you have the right Parameters and get all needed Finds on a page.
You can change the "Color Tolerance" and the "Pixel Hits" Parameters to get different results.
What is the "Color Tolerance"?
The Color-Tolerance value is a number between 0 and 765 that will tell the Robot how "fuzzy" he should treat Pixels.
Even if the number is zero, there is still an internal tolerance that is generally applied. So in most cases zero will be fine.
In special cases (see example below) it may help to use a value up to 200. Higher values are not recommended.
What is the "Pixel Hits" Value?
Each Pattern has a number of Pixels, for example a 8x8 Pattern has a number of 64 Pixels.
A Pattern of size 24x8 has a Total of 192 Pixels. The Pixel Hits Values tells the Robot, how many hits are needed to accept the result.
So for a 8x8 Pattern, the value can be between 1 an 64 (while values below 32 make no sense).
And for a 24x8 Pattern the value can be 1 to 192. Again values lower then 50% of the total Pixel number do not make sense.
What is the "See Details" Checkmark good for?
If you use this Checkmark, a new Window will appear that show for each hit, how many Pixel-Hits it has.
In the example below (recorded with a very high Color Tolerance) we got several Hits below 64 Pixel-Hits.
So you can decide if you want these or not and adjust the Pixel-Hits - Value to lowest necessary number.
Always try to keep the Pixel Hits as high as possible to just get the results you want to get.
Also try to keep the Color Tolerance on zero if possible.

Problems that can happen and the solution
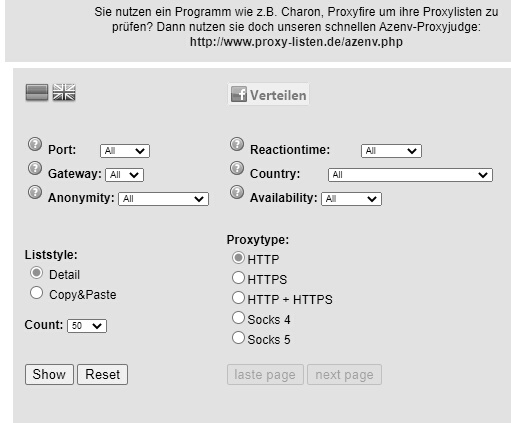
1. Lets say you have the Situation that you want to Click on some Control on a WEB-Site inside a Chrome-Type Browser.
These Browsers have not been supported so until now. Lets take this as an example.
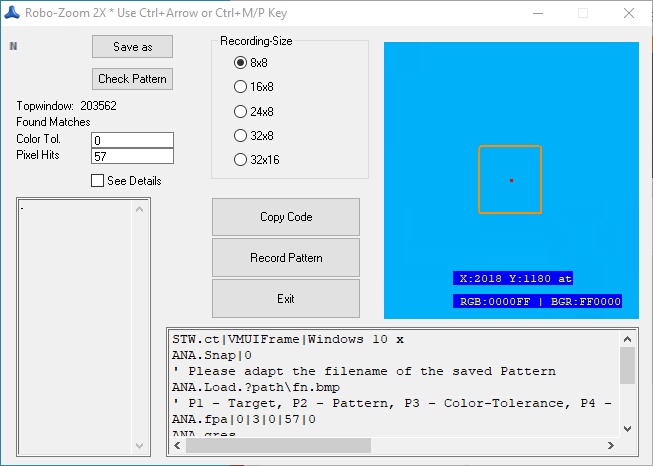
1. First we are starting the "HE-Recorder". It looks like this (Design and Features may change with next Updates).
The First thing we need to set is the "Recording Size". Currently you can choose between: 8x8, to 32x16 Pixel Objects.
As a rule of Thumb, the smaller the Object the better. Lets choose 16x8 this time.
2. While you move the Mouse over the Target Form, you can see how the Display in the "Robo-Lens" changes.
You can change the Magnification using the "ctrl-M" and "ctrl-P" Combination.
3. So next click "Record Pattern". The Mousepointer will change t and show a green Box that has inside exactly the size of 16x8.
Now drive to that Pattern and click the left Mouse-Button.
Hint: If the green Box will stay and not move, just click on the green Box and then Press "Record Pattern" again.
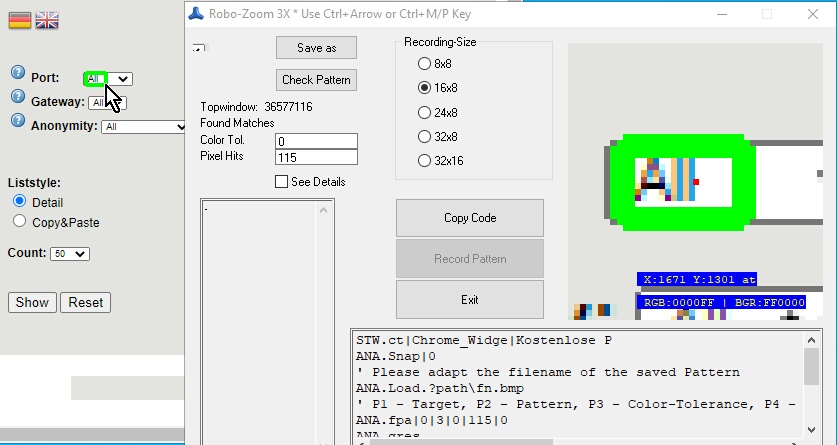
4. When the Recording is done, it is displayed in the upper left Corner. The Textbox down there shows the current Code.
But wait we are not yet done.
5. Click the "Check Pattern" Button. A new Window will appear and look like this:
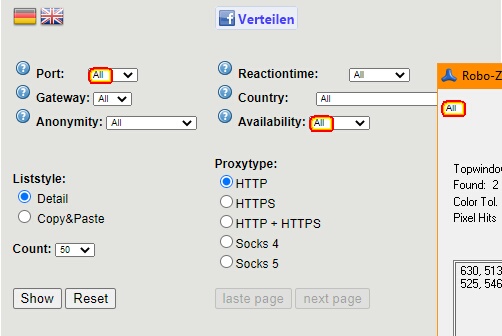
6. The Robot has found 3 Places with that Recorded Pattern. This is a very Simple Situation, you could just:
- Save the recorded Pattern into your Project Folder
- copy the code from the Textbox into your Script and correct the path for the Loading of the Pattern.
and you would be ready to go.
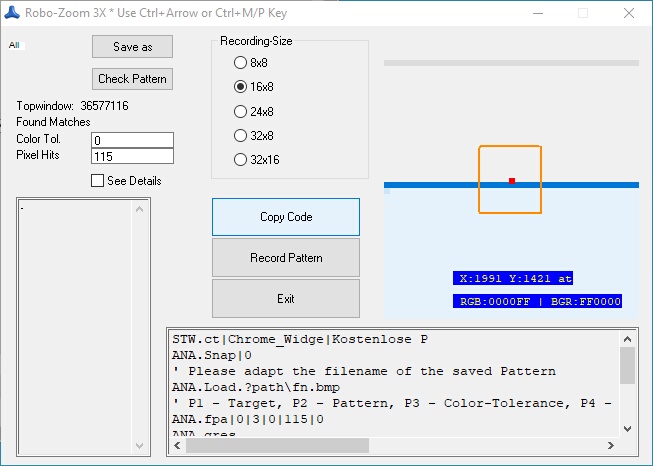
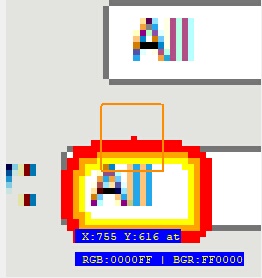
However, as you can see there are 4 Places with "All" that have not been selected. Click the Checkmark "See Details" and change the Value for "Pixel-Hits" to 99.
And change the Color-Tolerance Value to 200. Now click "Check Pattern" again. This time we will get nearly all "All"'s. Just one does not want to get selected.
The Lens will show you why. As you can see the rendering style for this All is too different. Watch out for this problem. If that happens, just record it separately.
Choosing the Color-Tolerance much too high may lead to thousands or even hundred thousands of "hits" that have to be tested.
Doing so may render the HE-Recorder "busy" for several Minutes. So better do not try Color Tolerances larger then 200. If that happens, just wait until the Recorder is available
or in the worst case, kill it using the Task-Manager.

If the Rendering style of the Pattern is too different, you may need to use separate Recordings.
The Final Code:
' Locate the Target Window
STW.ct|Chrome_Widge|Kostenlose P
' Snapshot it into an IR
ANA.Snap|0
' Please adapt the filename of the saved Pattern
ANA.Load.?path\fn.bmp
' P1 - Target, P2 - Pattern (Path and Filename)
' P3 - Color-Tolerance 0-765
' P4 - min. Hits (Pixel) this Value depends on the Patternsize. A 8x8 Pattern has mostly 64 hits. 16x8 would be 128 Hits at most.
' Generally the Recorder uses max. Hits-10%,
' P5 - Debugmode 0/1 - this is the same like the Details-Switch in the Recorder.
ANA.fpa|0|3|0|57|0
' Get The results
ANA.gres
' We take away the number of Hits from TOS
POP.$$NOH
' If no Hits, jump away to Lab_NoHits.
JIZ.$$NOH=0|Lab_NoHits
:Lab_NoHits
More Options?
Due to the Architecture of the ANA.-Commands, you can also use the ANA.fpa - Command on
Objects that have been processed.
You can use the ANA.Mask - Command, or use the ANA.Cdfx or other Commands to process the picture before applying the "FindPattern".
Of course you will need to also Record the Pattern then from an image that was processed before or just also apply the process to the Pattern.
In case of ANA.cdfx and ANA.cdfy it may be better to record from an processed picture.
ANA.Load|0|$$PAC\Plist.png
ANA.Load|1|$$PAC\All8.bmp
ANA.cdfy|0|2
ANA.Invert|2
ANA.Show|2!
This picture shows a ANA.cdfy processed version of the Browser-Window.
' Using the ANA.TriColor Option you can use TriColor pictures as Source
ANA.TriColor|0
ANA.Show|0!

The ANA.Grey Command, here I used the "1" and the "2" as Parameter. Note that in the right picture the Radiobuttons and the Buttons have been contrasted using this Option.
ANA.Grey|0|&H2
ANA.Show|0!
IMPORTANT NOTICE about Mouseover Effects:
When recording with the HE-Recorder, you may not see that the Button that you are over is changing its color. Due to "Mouseover Effects".
It is however visible for the FindPattern Command.
If you do NOT get AT LEAST the Pattern that you have recorded with a Color-Tolerance of "0" then you have had "Mouseover" Effects.
To prevent these, make a Screenshot of the Form (but not as .jpg due to Artefacts, but as .png or .bmp) and record from the Screenshot.
Recording from a Screenshot will prevent "Mouseover Effects".
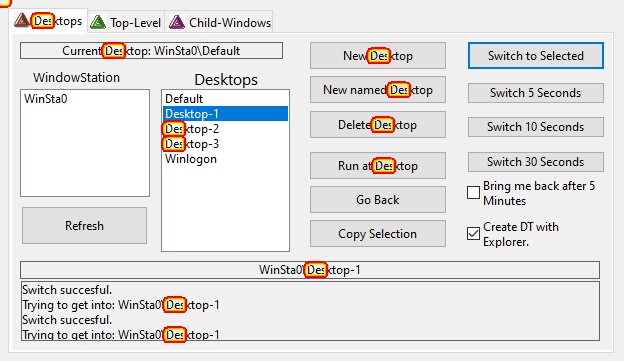
You can test this yourself with our "Desktops-Manager" Tool. If your record a Button, there is an invisible "Mouseover Effect".
Therefore you will not get even one result with a Color-Tolerance of "0".
If you record from a Screenshot of the program, you will immediately get the hits even with a Color-Tolerance of "0".
In the picture below we used a Color Tolerance of 50 to get the desired text on grey as well as on white background.