Stable Diffusion - how do i install it?
🎨 **Installation and preparation Guide** 🤖
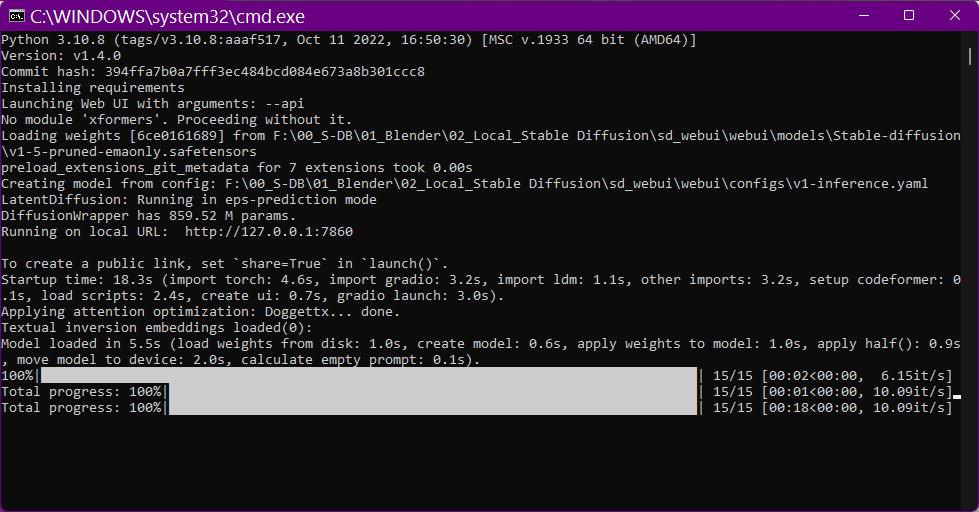
This is how stable diffusion looks, when it runs on your local Computer "in API Mode". Its just a Command line-Window.
To use it manually you would additionally start the WEB-UI, which we do not need here.
How to install Stable diffusion on your local PC
Hardware:
As Stable Diffusion runs on your local Computer, there are some things to watch out for:
1. Stable Diffusion heavily depends on a Graphics Card with a lot of VRAM. 8 GB is the Minimum. The higher the Resolution you chose for the Output, the more VRAM will be needed. If you run out of VRAM, you will not get a picture in return.
2. You have to install Stable Diffusion on your Local Computer or in your Network.
3. You need to add the --api Commandline parameter manually - details see below. Otherwise the SPR can not connect to Stable diffusion.
4. You need to run Stable diffusion to use it with the SPR. It will show up somehow like the picture above.
5. You do NOT need the WEB-UI if you use Stable Diffusion with the SPR in API-Mode.
If you want to use the WEB-UI, open any Browser and use this URL: http://127.0.0.1:7860
Using the WEB-Ui you can verify that your Installation of Stable DIffusion works.
But even then you will still need to add the --api Parameter, see below.
You can install Stable Diffusion locally on your PC using the **Automation1111 GUI**.
I recommend to use the **one-click install and run script** provided by Automation1111 ¹.
However, you still need to install **python** and **git** on your local Computer ¹.
You can also check out this guide on "How to Run Stable Diffusion Locally With a GUI on Windows ².
Get your models:
Download the newest SD-XL Models: https://huggingface.co/stabilityai/stable-diffusion-xl-base-1.0/tree/main
You need these 2 files: Put the "base" file in the Models folder.
Put the "lora" File in the "Lora" Folder.

Also download the Refiner here:
https://huggingface.co/stabilityai/stable-diffusion-xl-refiner-1.0/tree/main
![]()
Download this file and move it into the models folder.
Hint: Using the Image Generation from Open AI (AIC.Generate Image) all the work is done in the Cloud and you do not need to install anything
(but you need an API-Key and to pay for that). Using Stable Diffusion local, you need to install this and keep it running.
Quellen: 5.7.2023
(0) Model-Download: https://huggingface.co/stabilityai/stable-diffusion-2-1/tree/main
(1) AUTOMATIC1111/stable-diffusion-webui: Stable Diffusion web UI - GitHub. https://github.com/AUTOMATIC1111/stable-diffusion-webui
(2) How to Run Stable Diffusion Locally With a GUI on Windows. https://www.howtogeek.com/832491/how-to-run-stable-diffusion-locally-with-a-gui-on-windows/.
(3) v1.5 Download Guide | Stable Diffusion | AUTOMATIC1111's Web UI. https://www.youtube.com/watch?v=sN1r2L8Gg9A.
(4) Library to remove Background from Pictures: https://github.com/danielgatis/rembg
(5) Easy Diffusion from https://github.com/easydiffusion/easydiffusion
(6) Stable Diffusion: https://github.com/Stability-AI/stablediffusion
(7) CodeFormer: https://github.com/sczhou/CodeFormer (license: https://github.com/sczhou/CodeFormer/blob/master/LICENSE)
(8) GFPGAN: https://github.com/TencentARC/GFPGAN
(9) RealESRGAN: https://github.com/xinntao/Real-ESRGAN
(10) k-diffusion: https://github.com/crowsonkb/k-diffusion
(11) stable-diffusion-webui-docker https://github.com/AbdBarho/stable-diffusion-webui-docker
(12) API-Kit https://github.com/easydiffusion/sdkit/#is-it-fast
Further Links:
•AUTOMATIC1111/stable-diffusion-webui
Error "Detail: "
If you get this Error:
{"detail":"Not Found"} Unexpected output: {"detail":"Not Found"}
This means that you have Started the Stable diffusion Server without the --api Parameter.
This can happen, if you start "Webui.bat" instead of "webui-user.bat".
If you want use the SPR and your changes are in "webui-user.bat", then you must start Stable Diffusion, with this file.

Stable Diffusion WEB-UI
if stable diffusion is running, you can go to the WEB-UI using any Browser with this address::.
http://127.0.0.1:7860
(or wherever the URL is - can also be in your Network)
API-Docs for custom Calls
if stable diffusion is running, you can view the docs, using any Browser with this address:
http://127.0.0.1:7860/docs
(or wherever the URL is + /docs)
Here is a Short "step-by-step" guide on "how to install Stable Diffusion on a Windows PC" using the Automation1111 GUI:
1. Make sure you have **Python** and **Git** installed on your computer. If not, you can download Python from the official website:
https://www.python.org/downloads/ or use this direct link https://www.python.org/ftp/python/3.10.6/python-3.10.6-amd64.exe
and Git from the official website
https://git-scm.com/downloads or use this direct link https://github.com/git-for-windows/git/releases/download/v2.34.1.windows.1/Git-2.34.1-64-bit.exe
2. Open the **Command Prompt** by pressing the Windows key + R, typing `cmd`, and pressing Enter.
3. In the Command Prompt, navigate to the directory where you want to install Stable Diffusion by using the `cd` Command.
4. Type `git clone https://github.com/AUTOMATIC1111/stable-diffusion-webui.git` and press Enter to clone the repository
or use this direct link https://github.com/AUTOMATIC1111/stable-diffusion-webui/archive/refs/heads/master.zip to download it as a ZIP file and extract it to your desired location.
5. Once the repository is cloned or extracted, navigate to the `stable-diffusion-webui` directory - this is where you have localy installed it - by typing `cd stable-diffusion-webui` and pressing Enter.
6. Type `python launch.py` and press Enter to run the one-click install and run script provided by Automation1111.
7. Follow the on-screen instructions to complete the installation.
This is the Stable diffusion Installation folder.
Important!
Before you can use the locally installed Stable Diffusion with the SPR, you need to make some further changes.
Details on this changes can be found here API Guide.
1. In the Installation Folder you will find a Folder "webui". Open this folder.

Edit the File "webui-user.bat":file. Add this Line:
set CommandLINE_ARGS=--api
and also make sure the Path to your Python installation is valid.
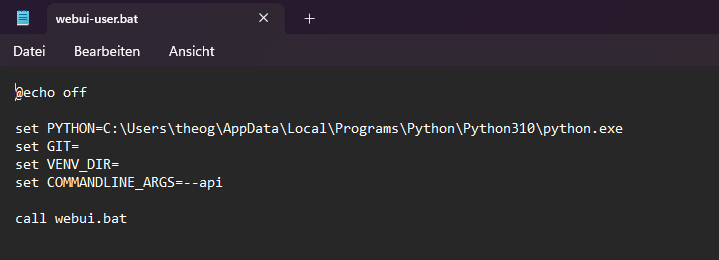
Otherwise Stable Diffusion will NOT accept any connection to the SPR.
This enables the API-Access.
How do I run the WEB-UI?
Running the Stable Diffusion "Local Server" is as easy as starting the
RUN.Bat - File
in the Installation Directory.
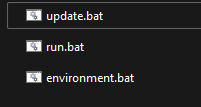
In the SD_WEB-UI Folder are the most needed Scripts - ready to run.
It makes sense to also use the "Update.bat" to make sure you always have the newest components.
Can i test this using Python?
1. Yes here is a Python Script that you can run to test if the API-Access works: To do this, simply copy the Python-Code into a Textfile, and rename it to "Test.py".
2. You will need to specify a valid Output path in the Python-Format (use \\ instead of \) in the Script below.
3. Then open a Command line window, use cd to go to the folder where this Test.py file is. Type python.exe Test.py
4. Then you should whether get the Script running or see error messages that hopefully bring you further.
5. If Python can generate the Picture then the SPR should also do it.
HINT: If you get errors you can always ask BING Search or ChatGPT for help. Often it help to just paste the error message to get the needed Information.
PS: Python often needs new updates for all sorts of Components.
import json
import requests
import io
import base64
from PIL import Image, PngImagePlugin
url = "http://127.0.0.1:7860"
payload = {
"prompt": "puppy dog",
"steps": 5
}
response = requests.post(url=f'{url}/sdapi/v1/txt2img', json=payload)
r = response.json()
for i in r['images']:
image = Image.open(io.BytesIO(base64.b64decode(i.split(",", 1)[0])))
png_payload = {
"image": "data:image/png;base64," + i
}
response2 = requests.post(url=f'{url}/sdapi/v1/png-info', json=png_payload)
pnginfo = PngImagePlugin.PngInfo()
pnginfo.add_text("parameters", response2.json().get("info"))
# Set the fixed path for the output image
output_path = "C:\\02_Local_Stable Diffusion\\sd_webui\\Test.png"
# Save the image to the fixed path
image.save(output_path, pnginfo=pnginfo)
print(f"Image saved at {output_path}")
Detailled Installation
Here's a detailed step-by-step guide on how to install Stable Diffusion locally on your PC with a graphical user interface (GUI), based on the information from the provided link:
Step 1: Install Python
•Go to the Python download page.
•Scroll towards the bottom of the page and click on “Windows Installer (64-Bit)” to download Python version 3.10.6.
•Run the executable file you downloaded and follow the installation prompts.
•If you already have Python installed, click “Upgrade”. Otherwise, follow along with the recommended prompts.
•Make sure to add Python 3.10.6 to the PATH if you get an option for that.
Step 2: Install Git and Download the GitHub Repository
•Download and install Git for Windows. Run the executable and use the recommended settings.
•Go to the GitHub repository for the Stable Diffusion fork with a GUI.
•Click the green “Code” button, then click “Download ZIP” at the bottom of the menu.
•Open the ZIP file and extract the contents to a directory of your choice (e.g., C:\stable-diffusion-webui-master).
Step 3: Download Stable Diffusion Checkpoints
•Go to the Stable Diffusion checkpoints download page (you may need to create an account).
•Download the checkpoints (note that the file size is several gigabytes).
•Copy and paste the file sd-v1-4.ckpt into the C:\stable-diffusion-webui-master\models\Stable-diffusion folder (or the directory where you extracted the GitHub repository).
•Rename sd-v1-4.ckpt to model.ckpt.
Step 4: Download GFPGAN Checkpoints
•Go to the GFPGAN checkpoints download page.
•Download the GFPGAN v1.4 checkpoints by clicking on “V1.4 model”.
•Place the file GFPGANv1.4.pth into the stable-diffusion-webui-master folder, but do not rename it.
Step 5: (Optional) Download ESRGAN Checkpoints
•You can download ESRGAN checkpoints if you want additional functionality.
•After downloading, extract the .pth file into the models/ESRGAN folder within the directory where you extracted the GitHub repository.
Step 6: Run the Installer
•Navigate to the directory where you extracted the GitHub repository (e.g., C:\stable-diffusion-webui-master).
•Double-click the webui-user.bat file. A console window will appear and begin fetching all the necessary files, building a Python environment, and setting up a web user interface.
•The first time you run this, it may take a few minutes as it needs to download several files.
Step 7: Access the Local Web Interface
•Once the console window displays “Running on local URL: http://127.0.0.1:7860”, open your web browser.
•Enter 127.0.0.1:7860 or localhost:7860 into the address bar and hit Enter.
•You should now see the Stable Diffusion interface where you can start generating images.
General Note:
•Be cautious when using third-party forks of software from GitHub. Make sure they are from a reputable source. Do not use them in critical Infrastructure but on dedicated Computers.
•If you encounter a “CUDA Out of Memory” error, try generating smaller images or adjusting the configuration settings in the webui-user.bat file.
Now you have Stable Diffusion installed locally on your PC with a GUI! You can startcreating and experimenting with images using the various options available in the interface.
Step 8: Generate Images using the WEB-Interface
•In the Stable Diffusion web interface, you will see various settings and options.
•Enter a description of what you’d like to create in the "Prompt" field.
•Set the "Sampling Steps" to define the number of times the image will be refined before you receive an output.
•Choose a "Sampling Method" from the dropdown menu.
•You can also set the "Batch Count" for the number of images to be generated, and the "Batch Size" for the number of batches.
•Set the "Width" and "Height" for the dimensions of the image you want to generate.
•Once you have configured the settings, click the "Generate" button to start creating images.
Catching Problems with wrong Python version?
You may need to delete the "venv" Folder and create it new using this Scriptfile:
@echo off
setlocal
REM Set the path to the Python 3.10 executable
set PYTHON=<your path>\Python\Python310\python.exe
REM Set the path to the project directory
set PROJECT_DIR=<Your Path to SD>\Stable_Diffusion\Automatic1111\stable-diffusion-webui\venv
REM Create a new virtual environment
%PYTHON% -m venv %PROJECT_DIR%
REM Activate the virtual environment
call %PROJECT_DIR%\Scripts\activate.bat
REM Upgrade pip
python -m pip install --upgrade pip
REM Uninstall protobuf
python -m pip uninstall protobuf -y
REM Install protobuf
python -m pip install protobuf
REM Install xformers
python -m pip install xformers
REM Install xformer
python -m pip install xformer
REM Deactivate the virtual environment
call deactivate
endlocal
Here you can see my WebUi-User.bat
@echo off
set PYTHON=<your path>\AppData\Local\Programs\Python\Python310\python.exe
set PATH=%PATH%;<your path>\AppData\Local\Programs\Python\Python310\python.exe;F:\00_AI\Stable_Diffusion\Automatic1111\stable-diffusion-webui\venv
set VENV_DIR=<your path>\Stable_Diffusion\Automatic1111\stable-diffusion-webui\venv
set CommandLINE_ARGS= --api --update-all-extensions
cd <your path>\Stable_Diffusion\Automatic1111\stable-diffusion-webui
git pull
call webui.bat