MiniRobotLanguage (MRL)
MOD. - Modules Commands
You can have up to 255 Modules with own Variables
Intention
TheSmart Package Robot only has variables with 3 letters, so the number of variables that can be used is limited.
Now you can have up to 255 modules (numbered 1 to 255), each with its own variable storage.
This means that when you create a new module, all variables are completely local to that module.
If you use the same variables in the main module or in another module, all variables will be undefined or have different values from that module.
What is a Module?
A module is a namespace of global variables. This means inside a module all variables that start with $$xxx have a dedicated value or are undefined.
Once you switch to another module all these variables may have other values and are defined or undefined as it may be in that module.
Generally modules are namespaces for variables and only for global variables.
These are all variables that start with the double dollar sign. Once you switch to a new module all these variables are whether empty or have that value that they have in that module.
Generally, you could use modules without namespaces and just switch to modules from number 0, which is the main module - it also has the name "main" - where you are generally inside, up to number 255, which is the highest number that is currently supported for modules. Because generally it is easier to work with named modules, that's why you can create named modules and use module names instead of numbers.
Module names are internally stored in lower cases.
No matter how you specify them or write them, they will always be converted to lower space names for easier usage.
If the module name already exists you will get an error message.
If you specify a number instead of a name then the robot will prefix the number with "Module_". This is necessary because alternatively to a module name you can also specify simply the module number in many Commands,
and then you will also switch or do whatever with that module. Therefore, module names can never be pure numeric.
Module names can be used to switch between Modules.
Generally there are two ways to use modules.
1. With Numbers
The simplest way is just to use the MOD. Command and a number behind it.
This number can be between 0 and 255.
If you use the Command like this you can generally directly enter the module with this number and define and work with the variables of this module.
If you want to use modules with names instead for better overview and oversight this is also possible.
In this case the names must be first declared and the modules must be created.
2. With Module-Names
Generally all 255 Modules (+ Module "main") exist at any time with their number. But they are nameless unless you give them a name.
If you give them a name, then you can address modules by their name or by their number.
Modules get a number from 1 to 255 in the order they are created. In fact you give the existing Module a name.
If a module is been deleted, only the name and all Variables are deleted, the Module number will still exist and can never be deleted.
Because of this, all following modules keep their number.
If you create a new module, means that you give the next "Nameless Module" a name.
What number does a Module (-name) get?
Generally the next free Number. Therefore Modules are numbered in order of their creation.
As Module "0" is fixed and reserved for the "Main"-Module, User-Modules start with number "1" and can go up to "255".
If you delete a previously created Module using "MOD.Delete", that number is free and will be reused if you create another Module.
When creating a new module, the robot checks which is the next free number and will use that number.
You can address modules always by their number.
If you want to do that and address modules always by their number it is necessary that the MOD.FORCE DECLARE Command is set to 0 otherwise the robot will force you to create all modules that you will use later first.
This is for larger projects where you have close control about the syntax and the used modules.
Can I transfer Variables from one Module-Space into another?
Testing the new module system, I have found that it is necessary to be able to transfer variables between the module spaces.
Therefore we have several Commands with the option to copy or move a variable from one module space into another.
Copy means you have the original variable and you have the copy of this variable, each one in its module space with the same name.
Alternatively you can also move variables from one module space into another module space and then the original variable is gone, is undefined, is not more available.
And in the target module space you will have that variable with that name and that type and that content.
So we have the two options copy and move variables between module spaces.
Modules are also copied into a new starting Parallel-Robot.
Lets see some Samples.
USAGE-Method 1 for small Projects.
$$VAA=In Main
PRT.$$VAA
MOD.1
$$VAA=In Module 1
PRT.$$VAA
MOD.2
$$VAA=In Module 2
PRT.$$VAA
MOD.0
PRT.$$VAA
MOD.1
PRT.$$VAA
' We use the DMP-Command to make all defined Variables visible
DMP.gv
MBX.Done
ENR.
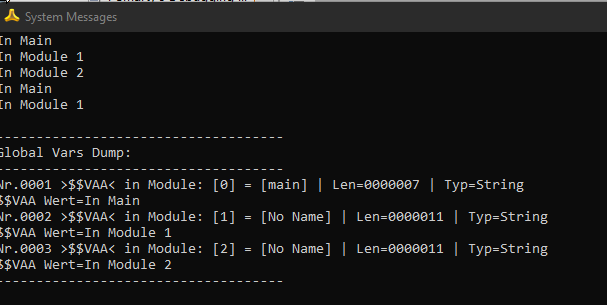
This is the Output from the Script above. We see that in fact there are 3 Variables defined with the same name but in different Modules.
Module "0" has always the Name "main". The other two modules have no name.
USAGE-Method 2 for larger Projects.
In this method you can enter Modules by their respective Name.
$$VAA=In Main
PRT.$$VAA
' This will be created as Module 1
MOD.New|Left Side Module
$$VAA=In Module 1
PRT.$$VAA
MOD.New|Right Side Module
$$VAA=In Module 2
PRT.$$VAA
MOD.Enter|Left Side Module
PRT.$$VAA
MOD.Enter|Right Side Module
PRT.$$VAA
DMP.gv
MBX.Done
ENR.
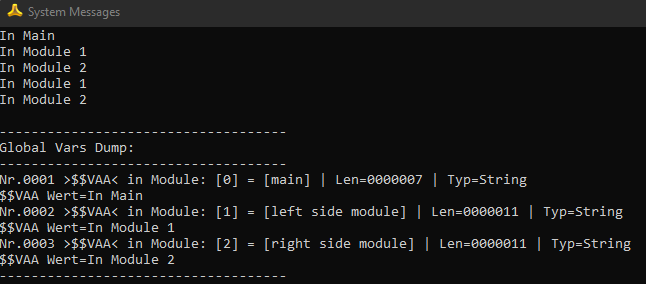
This is the Output from the Script above. We have now named these Modules.
Other Options with Modules include the usage of "Local Variables".
You have multiple ways of entering a module's variable space. 🤔 You can use the 📥 MOD.Enter Command. 👀
Using this, all the variables in this variable space will keep their values. 🤩
Or you can use MOD.Local. 🌟 If you choose MOD.Local, all the variables in this variable module will be deleted. 🚫💥
This will give you completely new local variables and when you switch back to the main module using "MOD.Enter|Main" you have your original variables back.
You can also use MOD.Leave to switch back to the main module and delete all variables from the last module where you have been.
MOD.Leave will not delete the module itself but just all the variables from the module will be deleted.
In case you want to delete a module together with all the variables, you can choose the MOD.Delete Command.
Using Modules with Subprograms and Macros
Using modules together with subroutines and macro definitions can have strong effects on passed parameters.
This is due to the fact that these macro and also the parameters are not replaced by the variable names during runtime but before, in the preprocessor.
If the module is changed beforehand, these variables naturally lose their content.
If you change the Module after wards, the variables will of course also no longer have their content.
So you have to make sure that you store transfer parameters differently, i.e. not in global variables ($$XXX).
At the moment, you can still use the so-called local variables (§§XXX), which do not lose their content and do not have Modules (and funny enough can be seen as "global" by now.
or you can use the stack for this which is possibly the better choice.
Speed-Considerations:
Working with Modules is fast. Using the numbers its even faster.
Example
'***********************************
' MOD.-Sample
'***********************************
Remarks
-
Limitations:
-
See also:
• ! Smart Package Robot 's Parallel Robot Operations