Smart Package Robot 's Mouse-Operations

Mouse-Positioning Engine Prototypes (Options for all Mouse-Moves and Clicks)
The use of the Mouse Positioning Engine is Simple. Just type MMV.MLC. or whatever you want to do.
This may be enough in 90% of all cases.
Then there may be a few advanced cases where you need more Features to "hit the point".
For these cases where you need more fine-tuning, you do get a lot of Options through the use of the following Prototypes (detailed Explanation see below!):
Generally in any Mouse-Command you can specify one or more Prototypes. And additionally you can specify coordinates or Quadrant-Coordinates.
This system was developed over the years to give you maximum flexibility. Here is an example.
GROUP I (based on rectangular Area) Prototypes
"w" - choose RECT from last located Window (Child-/ or Top-Window)
"t" - choose RECT from last located Top-Window
"k" - choose RECT from last located Child-Window
"a" - choose RECT from last located Accessible Object (E8) (using SAO.,AGR.,NAV. etc.)
"g" - choose RECT from last located graphical Object (E9) (using QFR,, ANA., UNI. etc.)
"o" - choose RECT from last located Object/Window (any sort of)
"s" - use Screen-Coordinates, these will go over the whole Screen, including Dual- or Multi-Monitors
for these "Base-Prototypes" you can specify additionally fine-tuning using:
- Quadrant coordinates like:
MMV.o|{A2-B4}
- numeric numbers (positive and negative)
MMV.o|-20,90
and you can combine this:
MMV.o|-20,90 {A2-B4}
also there are three Prototypes that will do sort of "left-right" or "Mid" Positioning, these 3 can not be combined with themselves:
"d" - Sort of LBO. - Positioning on the Left side of the current Rectangle.
"e" - Sort of RBO. - Positioning on the Right side of the current Rectangle.
"r" - Midpoint of the last RECT (default)
"u" - Move down by the size of the Windows-Titlebar
"v" - Move up by the size of the Windows-Titlebar
' Example (Combination):
MMV.oe|-20,90 {A2-B4}
GROUP II (based on Point) Prototypes
"m" - actual mouse-position. Usefull if the user moves the mouse somewhere and you want to act on that position.
"b" - last mouse-position, before last Move.
"p" - relativ to current "Active Point". (Default)
"l" - Last "Active Point".
Normally these Commands just "Act" on the current "Active Point", but they do NOT Move the current "Active Point".
If you want to do so, just add the "x"-Prototype.
"x" - Set Active Point at this position.
Example:
MMV.oex|-20,90 {A2-B4}
There is no rule about the order of the prototypes. Therefore:
MMV.oex|-20,90 {A2-B4}
and
MMV.xeo|-20,90 {A2-B4}
are both functionally equal.
Following is a more "in detail" Description:
Mouse-Positioning Engine
Generally the Location where the Mouse will do its next Action is called the "Activity Point" or in short: "Active Point".
The "Active Point" is normally set by other Commands that localize a window or object.
In each of these cases, the Active Point is the Middle-point of these rectangular Areas.
Therefore a Mouse Operation will normally start with the Selection of an Application-Window (called "Top-Windows").
STW.t|Title
This will "Locate the Window". Internally the Coordinates of the Window are stored, and the Point in the Middle of the Window becomes the "Active Point".
Now we can choose a Button. For example with:
SCW.c|Button
Next we can Move the Mouse there:
MMV.
This is the general Principle how the Mouse-Position Engine works.
1. Choose the Application-Window (STW.)
2. Choose the Button/Control etc. (SCW./AGR. etc.)
3. Move the Mouse or Click at that Place.
Now so far the easy part. You can do that in 90% of all cases this is all you need.
For the rest of cases,we have added superior possibilities to fine-tune Mouse-Positioning and Clicks.
You can use LBO. or RBO. to select a side of the target-Rectangle.
In case you do not want to click in the Middle, but rather left side, or right side.
STW.At|TestApp
AGR.43|Button 2
' Will change the RECT to the Left Side
LBO.
MMV.o|{A1}
ENR.
As LBO. will change the RECT, it can be combined with all fine-tuning Options, like numeric Input or Quadrant-Coordinates.
In such a case, the Engine will first calculate the Quadrant and then add the numeric input to the Quadrant-Middlepoint.
STW.At|TestApp
AGR.43|Button 2
' Will change the RECT to the Left Side
LBO.
MMV.o|-20,10{G4}
ENR.
Let's take a look on this line in detail:
MMV.o|-20,10{G4}
We use the Option "o" this says "use the rectangle from the last object". The last Object was the Button, that we have localized using "AGR."
If we would not write anything, the Mouse would drive to 0,0 - which is the upper left corner of the Button.
Now we fine-tune the Position relative to the upper-left-corner. We user a Quadrant-Coordinate {G4}.
For this the current Rectangle is been split into 8 pieces. They get Names from "A1" to "H8".
They are sorted like in the picture below. And the Mouse will drive to the Centerpoint of this Rectangle "G4".
And now the numeric coordinates are added to this Position in the last step.
You can use Quadrant-Coordinates for fine-tuning.
All Quadrant-Coordinates in the Mouse-Position Engine are 1/8 th Quadrants.
They go from A-H and from 1-8
This is different from the Standard-Quadrants which are 1/4 Quadrant (see below).

Here is an Example:
STW.At|TestApp
AGR.43|Button 2
MMV.o|{H7}
ENR.
Where it all started: Screen-Coordinates
Generally a Computer--Screen is made up of "Pixels". Depending on your Screen-Resolution, you may have for example
1920 Pixels horzontally and
1080 Pixels in vertical direction.
which would make your Screen to be build from a total of 1920x1080=2073600 Pixels.
Now you can Simply move the mouse by giving it the Coordinates of an Pixel.
For example, if you want the Mouse to drive to the Center of the Screen, you can just type:
' This will Move the Mouse to these Screen Coordinates
MMV.960,540
' This will just end the Script
ENR.
This will Move the Mouse-pointer to these "Screen Coordinates".
Please note that in all Examples, you can just replace the Command MMV.(Mouse Move) with the Command MLC. (Mouse Left Click)
to make the Robot Click to that place, instead of just Moving there.
' This will Move the Mouse to these Screen Coordinates and make a Left Mouse-Click
MLC.960,540
' This will just end the Script
ENR.
Depending on your Screen-Resolution, this place "960,540" may, or may not be the Centerpoint of your Screen.
Most often we do not use Screen-Coordinates, because we do not know the Screen-Resolution,
and we do not know "where on the Screen" our "Button" (or whatever we want to click) really is.
So whats the next step?
Better: Window-Coordinates
If we tell the Robot which "Window" we like to click into, we can use "Window-Coordinates".
Unlike Screen-Coordinates, these start at the upper left corner of the window.
And therefore the window can be anywhere on the Screen, we will always be right.
As long, as the Button we want to click did not move or change its size.
Now what you need to know that we deal with many sorts of "windows" here.
A window is the Application window itself - we call it a "Top-Level Window".
Another windows is any of the Control or buttons here.
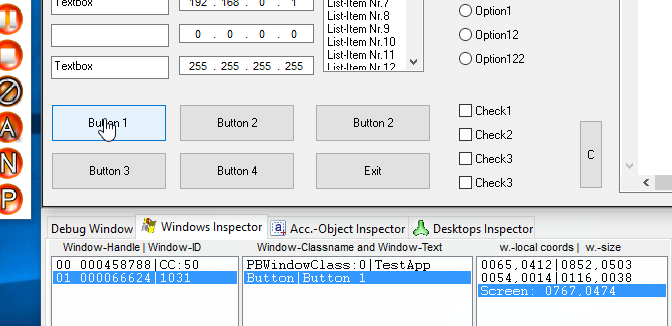
Not every Button must be a window. But if it is a window you will see it in the "Windows-Inspector",
see picture below. The "Windows-Inspector" also shows you the "Window-Coordinates" (right side:
- 65,412 - for the Application "Top-Level-Window" and
- 54,14 for the "Button-Control-Window"
below are the Screen coordinates (767,474).
On the right side of these coordinates you can see the size of these windows in X-Pixel,Y-Pixel.
You can Move the Mouse using Window-Coordinates like this:
STW.t|TestApp
MMV.w
ENR.
This will move the Mouse to the upper left corner (0,0 - Position) of the last localized (Top- or Child-)Window.
You can specify own Window Coordinates as well:
STW.t|TestApp
MMV.w|213,200
ENR.
Then the Mouse will move to these "Window-relative Coordinates". There is more. You can do inline Calculations with Mouse-Coordinates:
STW.t|TestApp
MMV.w|(22+8),(33-5)
ENR.
You can also use Variables and Formulas inline, for example to paint something:
STW.t|TestApp
FOR.$$LOP|1|29
MMV.w|($$LOP+8),($$LOP*2-5)
NEX.
ENR.
In Addition to the "w"-Prototype there are the two Prototypes "t" and "k". These will work with the last localized
"w"- Any Window (Last localized)
"t" - Top-Window
"k" -Child-Window (Button or GUI-Control)
There is one Extension to these Prototypes, that is the
"c" - Client-Area
If you specify the "c" additionally, the Mouse will take the Client Area as Origin. That excludes the blue Part (see Picture below) for Client-Area and Non-Client-Area.
Try this and see where the Mouse goes.
STW.t|TestApp
MMV.wc|
ENR.
Client-Area, Mouse-Position, Mouse-Click and the Active Point
Generally when you select an Application-Window, the Program will internally "locate" the window and remember its coordinates.
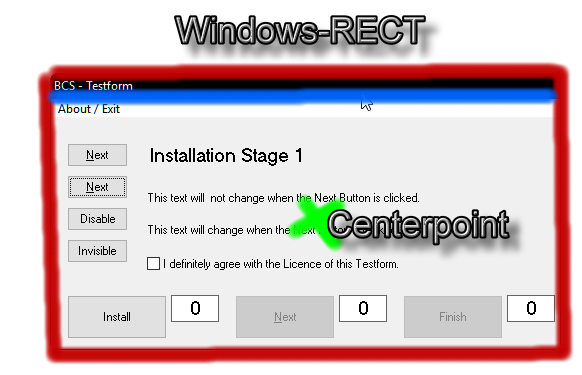
In this picture you can see the 3 important Elements:
1. (red) The rectangle around the whole Window
2. (blue) then "Non-Client Area" that is the Area that is occupied by the Title-bar, Scrollbar and resizing gadgets.
This part is different depending on Settings and windows-version.
3. The Centerpoint of the Window.
Simply by using the Command STW. - here by example
STW.t|Testform
you select an Window, and the Robot will automatically "locate it". The robot will find the window and "internally calculate the Centerpoint".
This point in the center of an located window (or object) is called the "Active Point".
You can not see the "Active Point", its just the Point where the Mouse is going to drive, or where you will Click next time.
At this time, when you use STW., the Mouse does not move. The robot just internally "locates" the window and calculates the Centerpoint.
The same is possible with a button or othe GUI-Elements. Any such Element has a surounding rectangle.
And a Centerpoint.
Using for example:
SCW.ct|Button|Button 1
you will locate this Button, and the Robot will localize its coordinates and calculate the Centerpoint.
Which is then the"Active Point".

Now you can just write
MMV.
and the Mouse will drive to the "Active Point", that is the Point in the Center of the last "localized Object".
Alltogether the Script will look as simple as this:
STW.t|TestApp
SCW.ct|Button|Button 1
MMV.
This will Move the Mouse over the Button-Centerpoint. Now there are more Options.
Remember, if you use:
STW.t|TestApp
SCW.ct|Button|Button 1
MMV.w|10,10
ENR.
this will move the Mouse 10,10 Points below and right the Origin (Upper,Left Corner) of the localized Button.
Move around the Centerpoint using "r"
What if you want to move 10,10 right and down of the Centerpoint?
Then you specify the "r"-Option.
STW.t|TestApp
SCW.ct|Button|Button 1
MMV.wr|10,10
ENR.
And if you want to go "Left and up"?
Then use negative Coordinates:
STW.t|TestApp
SCW.ct|Button|Button 1
MMV.wr|-10,-10
ENR.
Move Active Point using "x"
Normally when you do that, the Mouse drives there and also makes a Click if you say so,
but it does not Move the Active Point - that is the Point where the next Mouse-Action occurs.
If you want to Move the "Active Point" to that Location, specify the
"x" . Option - Move Active Point to th specified Location.
Checkmark-Position using "d" and "e"
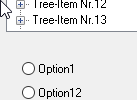
Sometimes you do not want the Centerpoint of your Rectangle. For example see the Treeview and Checkmark below.
To click the Checkmark, you may want to click on the Left side in the vertical Middle of the Rectangular Area.
To get the Mouse there use the
- "d" Checkmark-Position Left Side
- "e" Checkmark-Position Right Side
Options.
Note the Options: "d","e","r" can not be combined.
Also these options require an Base-Rect from "w","t","k" (or "o","g","a" see below) and will not work without these.
Other Rectangular Object
You can locate other rectangular Objects, using "Accessibilty"-Commands (called "E8") or graphical Commands (called "E9").
For these there are also Prototypes available.
"a" - last localizes Accessible Object
"g" - last localized graphical Object
"o" - any Object of these Two or the last localized window-object
Usage and Options are the same as with the window-Objects before:
STW.t|TestApp
AGR.43|Button 1
MMV.
ENR.
Also you can use the options "r","d" and "e" for these Objects. For eaxmple:
STW.t|TestApp
AGR.43|Button 1
MMV.ar
PAU.1
MMV.ar|10,122
ENR.
Point-based Objects
Unlike the Objects above, these "Sources" are not rectangular, but just "points" on the Screen.
Because they are not rectangular, there is no way to calculate an Centerpoint or to use the "d" or "e" Options.
You can anyway still correct these points with your own additional Coordinates.
These "Point-based Objects" are:
"m" - actual Mouse-Position
"b" - last Mouse-Position
"p" - Active Point
"l" - Last Active Point
and special:
"x" - set Active Point
You can not combine these with each other and also not mix these with the other Prototypes above.
STW.t|TestApp
AGR.43|Button 1
' Move Mouse to the Button
MMV.
' Now you have 3 Seconds time to move the mouse anywhere
PAU.3
MMV.m|10,100
' Now again you have 3 Seconds to move the Mouse around
PAU.3
MMV.b
ENR.
The "m"-Option makes sense, if you want to act from the Point "where the mouse is".
It may be there from a robot- or from a User mouse move.
The "b"-Option is similar. It remembers the last Position, where the Robot has moved the Mouse to.
If the user moves the mouse away, you can revert it to the "last robot-position" using the "b"-Option.
The "p"-Option is the same like if you write nothing. The Mouse will just move to the current "Active Point".
The "l"-Option is the previous "Active Point". The one before the actual.
Here is an example-Skript. The Mouse will move to the Button 2, and then move into the Window-Center,
because that is the place where the last Active Point was.
STW.At|TestApp
AGR.43|Button 2
' Move Mouse to the Button
MMV.p
PAU.3
MMV.l
ENR.
All possible Mouse-Parameters:
GROUP I (based on rectangular Area) Prototypes
"w" - choose RECT from last located Window (Child-/ or Top-Window)
"t" - choose RECT from last located Top-Window
"k" - choose RECT from last located Child-Window
"a" - choose RECT from last located Accessible Object (E8) (using SAO.,AGR.,NAV. etc.)
"g" - choose RECT from last located graphical Object (E9) (using QFR,, ANA., UNI. etc.)
"o" - choose RECT from last located Object/Window (any sort of)
"s" - use Screen-Coordinates, these will go over the whole Screen, including Dual- or Multi-Monitors
for these "Base-Prototypes" you can specify additionally fine-tuning using:
- Quadrant coordinates like:
MMV.o|{A2-B4}
- numeric numbers (positive and negative)
MMV.o|-20,90
and you can combine this:
MMV.o|-20,90 {A2-B4}
also there are three Prototypes that will do sort of "left-right" or "Mid" Positioning. These 3 can not be combined with each other.
"d" - Sort of LBO. - Positioning on the Left side of the current Rectangle.
"e" - Sort of RBO. - Positioning on the Right side of the current Rectangle.
"r" - Midpoint of the last RECT (default)
' Example (Combination):
MMV.oe|-20,90 {A2-B4}
GROUP II (based on Point) Prototypes
"m" - actual mouse-position. Usefull if the user moves the mouse somewhere and you want to act on that position.
"b" - last mouse-position, before last Move.
"p" - current "Active Point". (Default)
"l" - Last "Active Point".
Normally these Commands just "Act" on the current "Active Point", but they do NOT Move the current "Active Point".
If you want to do so, just add the "x"-Prototype.
"x" - Set Active Point at this position.
Important to know:
Moving the Mouse to a Point does not automatically move the actual Point.
To do this, use additionally the "x" Parameter. This is different from earlier versions.
Example:
STW.At|TestApp
MPO.o|57,415
MLI.
This does not make sense because, if you want to Click at 57,415 in the Topwindow, you would simply write:
STW.At|TestApp
MLI.o|57,415
In earlier versions this would have clicked at 57,415 - in Top-Window-Coordinates anyway.
From now, it will do what the Script says:
- Locate the Top-Window and set the actual Point in the Center of the Top-Window.
- Move the Mouse to that Coordinate
- Click into the Actual Point (that is still in the Center of the Top-Window)
If you depend on using an not needed MMV. or MPO. you can then add the "x"-Option.
This will move the "Active Point" and have the desired effect.
STW.At|TestApp
MPO.ox|57,415
MLI.
The MPO. and MMV. does only "Move the Mouse-Pointer" it does not move the actual point.
For this use the MAP. - Command or the "x"-Option with MMV./ MPO..