Starting Guide
Special issues with visual Setup Automation
The MSI-Installer Treeview and other Topics
This is how AI thinks an Installer Treeview could look like.
Navigating the MSI Installation Treeview
Sooner or later, you'll encounter the MSI Setup Treeview.
The image below showcases an MSI Treeview with an open menu.
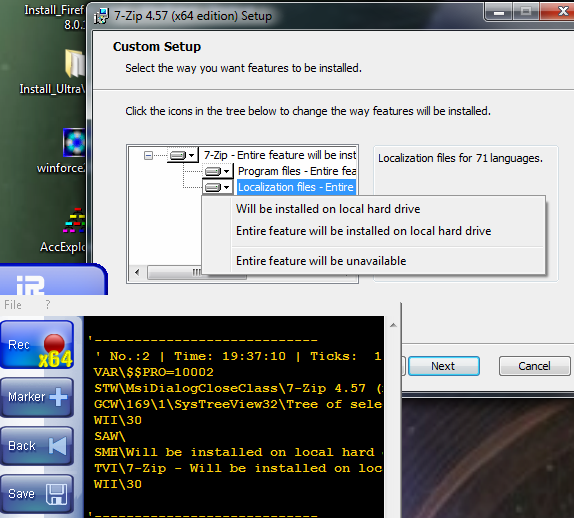
As you can see, InstaRec is the simplest method for generating code for this type of interface. In most cases, this is all you need to create a functional script.
Let's examine the final recording to understand how it works. Later, we'll explore advanced features that can help troubleshoot more complex situations.
Here's an example of the code that InstaRec generates for a menu selection in an MSI Treeview:
VAR.$$PRO=10002
STW.HBJwct|45|MsiDialogCloseClass|7-Zip 4.57 (x64 edition) Setup
SCW.wctid|45|SysTreeView32|Tree of selections|169|1
WII.30
SFW.
SMH.Will be installed on local hard drive
TVI.7-Zip - Will be installed on local hard drive\Localization files - Entire feature will be unavailable|i
WII.30
Let's go together through these lines to understand what each of them is good for.
First Line:
VAR.$$PRO=10002
This Line will set the Variable $$PRO to the value of 10002. This is only needed in case of an error. For details see the chapter 1.B Error handling.
Second line:
STW.HBJwct|45|MsiDialogCloseClass|7-Zip 4.57 (x64 edition) Setup
This line localizes the Application window. For details see 1.8. Selecting the Application (Topwindow)
Third line:
SCW.wctid|45|SysTreeView32|Tree of selections|169|1
This line selects the control (child-window). In our case its the tree-control. For details on selecting a child-window read this: 1.9. Locating Child-Windows .
Fourth line:
WII.30
This is a "Wait for Input Idle" command. It makes the robot wait until the tree-control can accept our input. For details see WII. - Wait-for-Input-Idle .
Fifth line:
SFW.
This is a "Set Foreground window" command. It's maybe not needed here, but as it does not cost a thing, InstaRec just places it here. It will bring the window on top of other windows that may possibly be at the same place.
Line No. six
SMH.Will be installed on local hard drive
Now it gets interesting. This is the SMH-command (Set Menu Hook). It doesn't really set a hook, the name is more for traditional reasons. However the SMH tells the robot that soon a menu may appear. And it tells the robot what to click in that menu. Like in most cases there is no need to always write the full string, as SMH. supports the 3.2 Standard-Search Pattern .
SMH.installed&ANDTHEN:drive
would also have been ok in our current case. Now we have told the robot that a menu will come up. The next line will bring the menu up:
Line No. seven
TVI.7-Zip - Will be installed on local hard drive\Localization files - Entire feature will be unavailable|i
This line is the key part of the whole code-block. Therefore we will take a closer look at it. First we have a TVI. - command. This command does NOT support 3.2 Standard-Search Pattern
for compatibility reasons with WinRobots compatible Scripts.
Instead it supports the old wildcards the * and the ?. There is a difference however. While you could use these wildcards only at the start of the tree in WinRobots-Script, the more advanced MR-Engine allows you to use them anywhere in the command, even at multiple places.
And in case you prefer to use the 3.2 Standard-Search Pattern you have as an alternative to TVI. the TVF.-command, that supports these more advanced Patterns.
Lets take a look at the TVI.-parameters. First we have the description of the Treeview Item.
Its like a path, even like a file-path. It also uses the \ as a divider of the tree branches. So we have these tree branches:
Root: 7-Zip - Will be installed on local hard drive
then: Localization files - Entire feature will be unavailable
at last we see that there is a
|i
at the end of the TVI.-line. Taking a look in the help file here: TVI. - Tree View Invisible
we can see that this should open the MSI-Menu on the selected tree-item.
If you record MSI-Tree's using InstaRec, the result should always look somehow like this.
It should never contain screen or window coordinates. This can happen, if you move out of the menu window at recording time. If thats the case, you best do the whole thing again.
Now lets take a case where anything was properly recorded, but still doesn't work.
Troubleshooting: What to Do When Things Go Wrong?
Our example above presents a challenging situation for three reasons:
a) The item's position isn't perfect after localization.
b) The treeview is too small.
c) The "|i"-flag doesn't open the menu as expected.
To address these issues, we need to break down the problem and analyze each step. Let's start by checking if the tree-item's localization is functioning correctly.
STW.HBJwct|45|MsiDialogCloseClass|7-Zip
SCW.wctid|45|SysTreeView32|Tree of selections|169|1
' I have removed the |i here
TVI.7-Zip - Will be installed on local hard drive\Localization files - Entire feature will be unavailable
' The Mouse should move to the tree-item
MMV.
This is what we get.
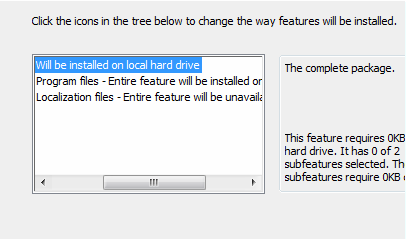
Yes, the Mouse moves into the middle of the tree-item. Thats normally just what we want, and its completely Ok. But now - how do we select the Menu from here?
First we will use the capability of the TVI.-command and shorten the recorded line a bit. This makes it easier for us to work with it.
TVI.7-Zip*\Localization files*
Will do the same as the large line from above. We have used the ability of using the * wildcard to shorten the line. Now back to our problem. We can't shorten the Tree-Item text, but we can resize the tree-control. And this is what we do.
STW.HBJwct|45|MsiDialogCloseClass|7-Zip 4.57 (x64 edition) Setup
SCW.wctid|45|SysTreeView32|Tree of selections|169|1
' resize the tree control
SWP.10,100|466,166|C
SCW.ct|static|The complete
CLW.
SCW.ct|static|this feature requires
CLW.
ENR.
The tree-control is too small. So we just make it larger.It looks like this (step-by-step):
After the:
SWP.10,100|466,166|C
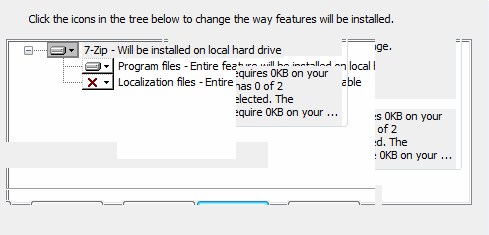
it looks a bit chaotic, but we are not yet ready. There are two statics in our way. As statics are child-windows, we can make them invisible, or just close them using the CLW.-command.
After these two lines:
SCW.ct|static|The complete
' Close the text-child-window
CLW.
SCW.ct|static|this feature requires
' Close the text-child-window
CLW.
' End the Testscript here
ENR.
These statics are history. We have a clear view now:
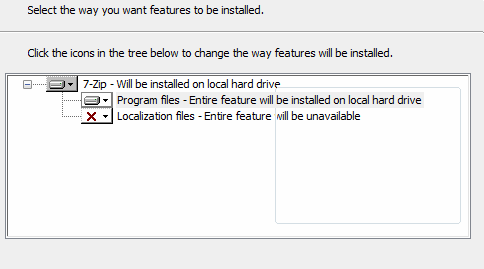
This means we have enough space also!
Now we try to solve the next problem: the menu doesn't open!
We use this code from the Editor.

What we see is, that the mouse moves really to the right point in the tree. But the click seems not to work! Next we try it ourselves.

We have changed the MMV. (Mouse Move) to a MLE. (Direct Engine Mouse Click).
Starting the script, all we see is that the selection of the tree-item changes.
But no menu opens.
In such cases, we need to switch over to the "real Mouse-Click". We need the "compatible engine". In short, we need to use MLI. or MLC.

And, voila - problem solved, here is our menu. That will do the Job! See the picture below.
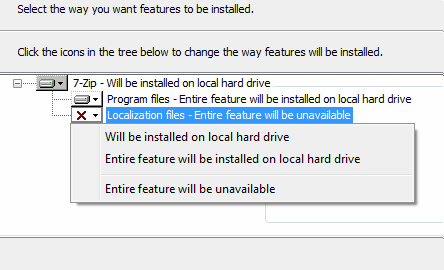
Now we just need to put the whole thing together.
First we prepare the tree-control.

Then we make our selection:

Our Final, Functional Code

Here's our final, working code.
If you're using this for software distribution, please note that it employs the "compatible engine."
As such, it must be distributed following the rules applicable to the compatible engine which needs a real Mouse-Pointer.