MiniRobotLanguage (MRL)
ANA.FindPattern
Get Locations of a specified Pattern-Object in an Image-Register (IR)

Intention
The "FindPattern" Command is designed to identify the positions of a specific object within an image. This Command utilizes a four-level Fuzzy-Logic algorithm. Users can modify the color tolerance and specify the minimum number of "pixel hits" necessary for a match.
To streamline the process of pattern recording, we offer a tool called the Human Eye-Recorder.
This tool simplifies and accelerates the recording of patterns. However, please consider the following when using the pattern recording feature:
1. Mouseover Effects: If the recorded pattern includes objects that change color when the mouse hovers over them, these color changes might not be visually noticeable. Despite this, the pattern matcher will detect these changes and might avoid matching the pattern if the color tolerance is set to zero. To manage this, we suggest capturing a screenshot of the window and recording the pattern from the screenshot to ensure a consistent color representation.
2. Image Format: It is important to use image formats without compression artifacts when working with the pattern matcher Commands. Avoid using JPG or other compressed formats, as they may introduce unknown quality issues. It is best to use uncompressed formats such as BMP or PNG.
If you face difficulties with pattern matching due to mouseover effects or other factors, consider adjusting the color tolerance or capturing a screenshot for pattern recording. While increasing the color tolerance is not ideal, it might still provide satisfactory results in many cases.
1. Capture Screenshot of Window and use it for Pattern-Search
This will include all Screens on a Dual-Screen System. Here we search a Pattern on the complete Desktop.
STW.ct|Progman|Program Manager
' We Snapshot the Desktop into IR 0
ANA.Snap|0
' This is the Pattern we search for
$$PAA=?path\Help16.bmp
' We load the Pattern into IR 1
ANA.Load|1|$$PAA
' This is the Pattern Searching Command,
' Due to the value "1" as last Parameter, we will get a Debugprint
' of all found Hits. The displayed Point is in the Center of the Pattern.
ANA.fpa|0|1|0|125|1
' This Command will put the results of the search on to the Stack.
' Number of found Patterns is on TOS
POP.$$POA
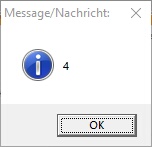
MBX. We got $$POA Results
' We do not need first 3 Found Pattern so we remove them from Stack
STJ.Remo|0|1|2
' This is the Pattern we drive to
POP.$$POA
MMV.t|$$POA
MBX.!
ENR.
2. Capture Screenshot of a Window and use it for Patternsearch
This is the normal case. You will only search the Pattern in a Target Window. Using the HE-Recorder-Tool and the "Check Pattern" Button,
you may get a result like this:
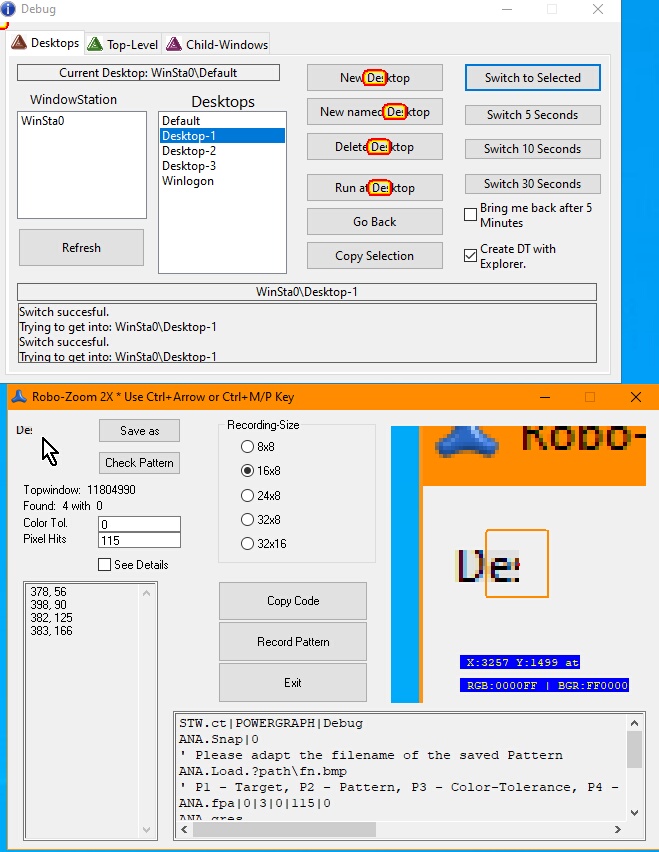
Using theHE-Recorder Program you may get a result like this.
The Code is generated using the HE-Recorder. You may need to change the Path for the Pattern.
The "found hits" will be on the TOS.
STW.ct|FORM_DESKTOPS_MANAGER_FRMMAIN_CLASS:0|Desktops-Manager
'SWP.4090,2|640,400|T
ANA.Snap|0
' Please adapt the filename of the saved Pattern
ANA.Load|1|?path\De16.bmp
' P1 - Target, P2 - Pattern, P3 - Color-Tolerance, P4 - min. Hits (Pixel) maximum Number:128 . We use -10%, P5 - Debugmode 0/1
ANA.fpa|0|1|0|115|0
' We take away the number of Hits from TOS
POP.$$NOH
' If no Hits, jump away to Lab_NoHits.
MBX.$$NOH
ENR.
IMPORTANT NOTICE about Mouseover Effects:
It is important to note that when recording patterns using the HE-Recorder, you may not visually perceive the "Mouseover Effects" on buttons or objects. However, these effects are visible to the FindPattern Command during pattern matching.
If you are searching for a recorded pattern and do not obtain any matches when using a color tolerance of "0," it indicates that "Mouseover Effects" were present during the recording. To avoid this issue, it is recommended to capture a screenshot of the form or window (preferably in .png or .bmp format to avoid compression artifacts) and record the pattern from the screenshot.
Recording from a Screenshot will prevent "Mouseover Effects".
Recording patterns from a screenshot eliminates the influence of "Mouseover Effects" and ensures accurate pattern matching. You can verify this behavior by using our "Desktops-Manager" tool and recording a button with invisible "Mouseover Effects." Without a screenshot, you will not obtain any matches with a color tolerance of "0." However, by recording from a screenshot, you will immediately obtain the desired matches even with a color tolerance of "0."
Alternatively, you can overcome "Mouseover Effects" by using a higher color tolerance. However, this approach may result in an increased number of unintended matches, so caution should be exercised. For example, using a color tolerance of 50 may yield more hits, including false positives.
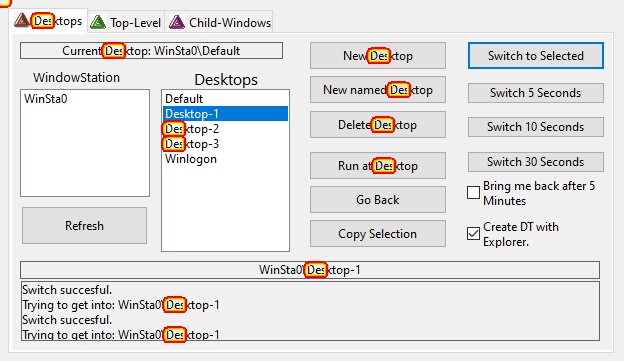
Here i have used a Color-Tolerance of 50. So i got results on grey and on white background.
IMPORTANT NOTICE about missing Administration Rights Effects:
If you're initiating the script from an SPR-Editor without administrative rights, you might face challenges in loading images from the standard robot path.
This path is located under C:\Program Files (x86), a directory that generally requires administrative access to load files. This could lead to black images when using the ANA.Load Command.
To circumvent this issue, try executing the script with administrative privileges. This should provide the necessary permissions to correctly load the images.
Syntax
ANA.FindPattern[|P1][|P2][|P3][|P4][|P5]
Parameter Explanation
P1 - opt. Target IR Image-Register number for Target, if omitted, IR 0 will be used.
P2 - opt. Pattern IR Image-Register number for Pattern, if omitted, IR 1 will be used.
P3 - opt. Color Tolerance, if omitted 0 will be used.
P4 - opt. Pixel-Hit Tolerance, if omitted a default value will be used. This value depends on the Pattern-Size that you feed into the Command.
Please see below for a comprehensive explanation of P4.
P5 - opt. 0/1 - Debug-Flag see below

About the P4 - Parameter ("Pixel-Hits"):
The maximum number of matching pixels in your pattern is determined by its size.
For example, an 8x8 pattern can have up to 64 matching pixels, whereas a 24x8 pattern can have up to 192.
P4 is based on the total number of pixels in the pattern.
If you set it to 63, for instance, it means that at least 63 pixels must match the pattern, including the tolerance.
If you input a negative number for P4, such as "-15", it's treated as a percentage of the total pixel count, translating to "15% of the maximum pixels of that pattern".
If you leave it empty or set it to 0, the default value will be 85% of the pixel count in the pattern.
P4 denotes the minimum number of matches needed to accept a result.
Be careful not to set P4 too low, as it could potentially overwhelm the system with a massive number of results.
This Command has some special features regarding the "Pixel-Hit Tolerance Parameters".
1.If you specify "0", the Command will calculate the maximum possible number of hits for the loaded pattern and take 85% of that value.
2.If you specify a negative value like "-69", the Command will also calculate the maximum possible number of hits for the loaded pattern and take that as 100%. In this example, it would be 69%, so if this is a 12x12 pattern and therefore has a maximum of 144 pixel-hits, 69% of that would be 99 pixels.
3.You can directly specify a positive value that is the exact number of needed pattern-pixels for the pattern to be considered as found.
4.The maximum number of found results is limited by the setting of "MaxResults" using the ANA.SetData Command.
5.Due to the use of multiple CPU cores at different places at the same time, there is no guarantee in which order matches are returned.
6.The Command will leave a 0/1 on the TOS. As always, a 0 means error, while a 1 means "all fine". For example, if one of the IR's does not exist, then you will get a result "0" on TOS. The program will not generate an error message.
The Command leaves a 0/1 on the TOS. Consistently, 0 signifies an error, while 1 indicates that everything is fine.
For instance, if one of the IR's doesn't exist, you'll receive a "0" on the TOS.
The program won't generate an error message in this case.
About the P5 - Parameter ("Debug Flag"):
The Flag-Parameter meanwhile can do a lot more then just help Debugging.
1 - Enable Debug-Output in Console Window
2 - Snap last used Window again if not found
4 - Use "Difference Map Search"
8 - Disable Filtering (if set)
16 - Use "Invert Pattern"
32 - Use "Complement Pattern"
64 - Use "Extended Search" (takes longer, makes more evaluations)
The results of the Operation can be accessed with the "ANA.gres" Command.
Example
Capture Screenshot of complete Desktop and use it for Pattern-Search
This will include all Screens on a Dual-Screen System. Here we search a Pattern on the complete Desktop.
'***********************************
' ANA.FindPattern-Sample
' This example shows multiple technics
' That are used together with "FindPattern"
' In this case we search over the whole desktop
'***********************************
STW.ct|Progman|Program Manager
' We Snapshot the Desktop into IR 0
ANA.Snap|0
' This is the Pattern we search for
$$PAA=?path\Help16.bmp
' We load the Pattern into IR 1
ANA.Load|1|$$PAA
' This is the Pattern Searching Command,
' Due to the value "1" as last Parameter, we will get a Debugprint
' of all found Hits. The displayed Point is in the Center of the Pattern.
ANA.fpa|0|1|0|125|1
' This Command will put the results of the search on to the Stack.
' Number of found Patterns is on TOS
POP.$$POA
MBX. We got $$POA Results
' We do not need first 3 Found Pattern so we remove them from Stack
STJ.Remo|0|1|2
' This is the Pattern we drive to
POP.$$POA
MMV.t|$$POA
MBX.!
ENR.
'***********************************
' ANA.FindPattern-Sample
' This is a real-Life Example-Skript
' It can scroll through a Social-Network and click all
' Found-Buttons that match the Pattern in Picture NoAbo8.bmp
' Then after all are clicked it will Scroll down to find more.
' You need to change the Top-Window STW. to your Browser
' and you need to record the "Like-Button" ($$PAC)
' or whatever you want to Click.
'***********************************
VAF.$$PAC=?pattern\NoAbo8.bmp
ANA.Load|1|$$PAC
:Lb_Start
STW.ct|Chrome_WidgetWin_1|- Brave
HTV.$$HWN
ANA.Snap|0
GSB.Check
ANA.rsl
ANA.fpa|0|1|0|64|0
POP.$$POB
JIZ.$$POB|Do_ScrollB
FOR.$$LOP|1|$$POB
POP.$$POA
DBP.$$POA
SCW.h|$$HWN
MLI.t|$$POA
'PAU.4
NEX.
:Do_ScrollB
GSB.ScrollX
GTO.Lb_Start
'-----------------------------------------------------------
:Check
IKS.{SHIFT}
END.
EIF.
RET.
'-----------------------------------------------------------
:ScrollX
STW.ct|Chrome_WidgetWin_1|- Brave
MPO.t|1120,998
MLC.t|1120,998
MWR.-650
RET.
ENR.
'===========================================================
Remarks
Speed Considerations:
1. The Command is "Multithreaded" and works best with a Multicore CPU.
2. The Command will need a lot of CPU-Power, it may also use the GPU at some point internally.
3. Generally the Command is very fast even in very large windows, as long as the Computer has a modern CPU.
4. The larger the Pattern, the slower the process.
5. Currently it may speed up the process, if you have the pattern touch the upper left corner. This may change in the future.
6. If a Pattern is very slow, just record another Pattern. And try this again.
7. A pattern that is completely empty will not work as there is nothing to recognize in it.
Do not use ".jpg" Images or images that are compressed with Artefacts. Generally use ".bmp" or ".png" Images. Otherwise the result will be hard to predict.
Limitations:
Choosing wrong values for P3 and P4 may overrun the robot with too many "fitting results" and may keep the system busy for minutes.
We did not yet implement an "Maximum number of results" at this time.
The resolution of the Pattern-Images that can be used is limited to those resolutions that can be saved with the "Human Eye-Recorder"-Tool.
See also:
•